Logo
15/07/2026
PowerStamper
Stamping an Old Shoe
Download PowerStamper Tutorials Scenes.
Starting up!
In this tutorial, we will paint an old shoe in six stamping steps.
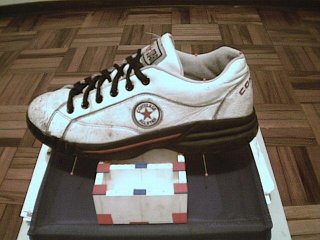
Open the file PaintShoe.max.
The scene has a Shoe, a LEGO* Reference Box, and set of cameras. Each one of this cameras has its own background image:
| Camera_top | : | shoe_top.jpg |
| Camera_left | : | shoe_left.jpg |
| Camera_bklf | : | shoe_bklf.jpg |
| Camera_back | : | shoe_back.jpg |
| Camera_bkrt | : | shoe_bkrt.jpg |
| Camera_right | : | shoe_right.jpg |
The shoe was modeled using Camera Match to create the cameras using the LEGO* Reference Box, and using the free Mankua plugin ViewTools to create 3D points from different camera viewport backgrounds. From this points a Spline mesh was built and converted to patches using the Surface modifier.
If you like, you can do first the ViewTools tutorial Modeling an old shoe with ViewTools. However, it is not necesary for this PowerStamper tutorial.
Creating the Mapping Channel
For the DEMO version you can ignore this segment and jump to Stamping the top zone of the shoe. However, it was included to show you how does UVW Frame work.
To create the uvw mapping channel we will use Edit Mesh, UVW Frame Helper obj and UVW Frame Modifier. This technique will let us organize our UVW mesh to obtain a single unstretched UVW channel in a few steps.
- Select the shoe and hide all the unselected objects, cameras and lights.
- Create a copy of the shoe, and move it to the right. Rename this object uvw.Shoe
- Using Editable Mesh tools, select the right side faces and click the Detach button. Check the
Detach to Element option and move the new element to the right.
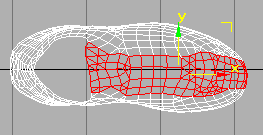
Selected Top Faces
If you Detach the faces as a new object, the number of faces in your uvw mesh object will change, and this object won't be usable as an uvw mesh for the shoe anymore.
- Select the faces in the back of the shoe, and detach them to a new element. This breaks the Shoe
in four different elements.

Selected Back Faces
- Using Move and Rotate tools, organize the elements putting all the faces paralell with the XY grid and
trying to use the least area possible.
You can move vertex groups if needed, but never delete faces. The face count must remain the same always! When
your elements are ready, scale all the vertices in the Z axis to obtain a 100% planar mesh.
- Go to the Create panel > Helper Objects, and create a UVW Frame Helper object around the uvw. Shoe mesh and use the Pick Mesh button to create a link between the uvw mesh and the UVW Frame.
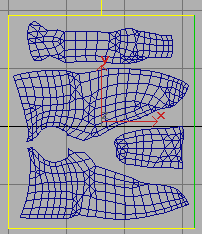
uvw.Shoe mesh and the UVW Frame helper object
The UVW Frame Helper object works as a frame for meshes, so they can be converted to UVW mapping space with the UVW Frame modifier. This helper-modifier system gives the user unlimited UVW Unwrapping techniques and tools, since all edit mesh tools space warps and object modifiers are available to edit and adjust the UVW Mesh.
NOTE: To unwrap and edit an existing uvw channel, use the Save option in the Unwrap UVW modifier, and Load the new mesh using the Load button in the UVW Frame helper object. This creates a new uvw mesh object inside the UVW Frame.
- Select the original Shoe object, and apply the UVW Frame modifier to it. Leave the Map Channel as 1
and click the None. Pick the UVW Frame Helper object. This creates a new mapping channel for our shoe.
If you like, you can now collapse the Shoe stack and delete the UVW Frame Helper object and the uvw.Shoe object.
Stamping the top zone of the shoe
We will start stamping the top zone of the shoe, where the shoestrings and the tongue are.
To stamp this zone, we will use shoe_top.jpg image and camera_top:
- Hide everything but the shoe.
- Set the Perspective camera view point to camera_top.
- Set the Viewport Background as shoe_top.jpg.
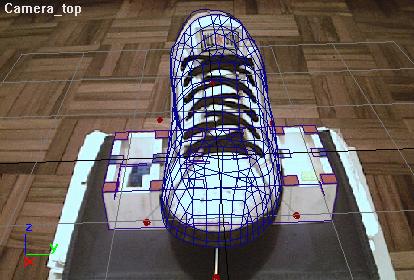
The Shoe matching the viewport background
- Go to the Utilities Panel and open PowerStamper utility.
PowerStamper works with the selected objects. In order to properly stamp an image, you need a source or stamping image and an image (or set of images) that will be stamped. The images that will be stamped, are the images that you will use later in the material as the diffuse channel.
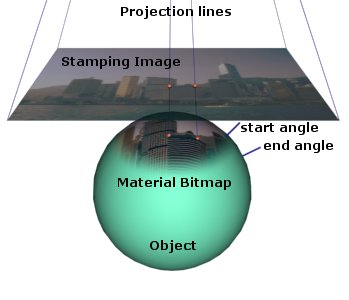
PowerStamper projection
- Select the shoe (make sure the name Shoe is displayed in the Selection box).
- Click the Stamping Image button, and set the input image to shoe_top.jpg.
Click OK.
PowerStamper can use images painted by you using a render as a reference, that is why it asks to confirm overwriting. If you click the Render button, a new image will be rendered from the viewport (using the shoe_top.jpg image size and properties) and saved to shoe_top.jpg.
- Leave samples and prefiltering as they are.
- Set the Stamping Attenuation to angle start = 90.0 and angle end = 90.0.
- Check Premultiplied Alpha.
- Set the material bitmaps we will Stamp:
Click the Output Bitmaps button, and in the Output Bitmaps by Material ID dialog box click the Set Output Bitmap button. Set the name for the new bitmap to shoe_map.tga and set its size to 600 × 800.
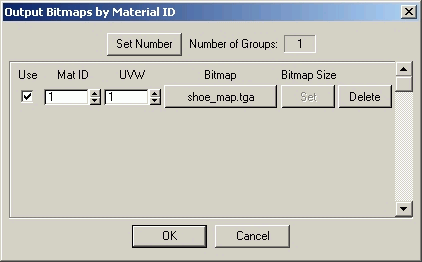
Output Bitmaps dialog box
- Everything is now ready, remember that PowerStamper works with the active
viewport, so make sure that camera_top is the active viewport.
- Click the Stamp button.
The stamping progress is shown in the bar besides the Stamp button.
- Set the new shoe_map.tga bitmap as the diffuse channel in a new material, and
apply this material to the shoe.
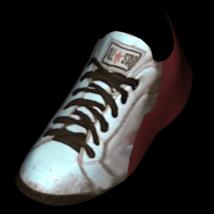
First Stamped material
Stamping the right (_right) zone.
Since creating a 3d shoe that matches the original viewport backgrounds and camera data is nearly impossible (or needs a lot of time), we will use Edit Mesh to make the mesh match the viewport background for every stamping process. (If Mohammed won't go to the mountain, the mountain must come to Mohammed). This will provide us a good result faster than trying to find the exact cameras and modelling an exact shoe!
- Set the camera to camera_right and the viewport background to shoe_right.jpg.
- In the Materials Editor, set the opacity of the shoe material to 50 and in
shoe_map.tga Bitmap set Show Map in Viewport.
- Use Editable Mesh and FFD tools to adjust the mesh to match the viewport background shoe
shape and details. Take special care with the shoestring holes and the shoestrings, trying
to make the mesh match them in the background the best possible.
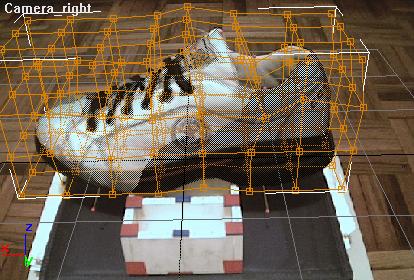
Right side of the shoe matching the viewport background
- PowerStamper stamps only the selected faces, or all faces if no faces are selected. To
limit the stamping to just the right zone of the shoe, select all the faces in the right
side of the shoe. Beside working as a good attenuation tool, this speeds up the stamping
process by excludin non-selected faces.
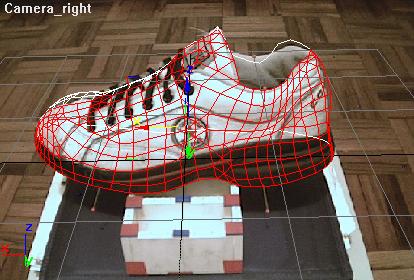
Selected faces in the right side
Painting the Alpha Channel in a 2D Paint Application
The process to paint the alpha channel won't be described here in full detail, but I will show the basic steps to reproduce it in any 2D Paint Application that supports Layers and Masks.
The main idea is to render the Shoe object with shoe_map.tga applied in the diffuse channel, and to paint over it using the shoe_right.jpg image. Instead of painting or cloning the image, we will use Layers and Masks to control the display of shoe_right.jpg. This way, when you edit the Mask of shoe_right.jpg layer, you will feel like you are effectively painting the show with its own material, and you can control exactly how the final material will be applied.
- Set the material opacity to 100 and Render a 640 × 480 image of the camera_right viewport
(Use 3ds max Render button instead of PowerStamper button since we don't wan't to
overwrite show_right.jpg) and save this image as rend_right.tif.
- Open rend_right.tif and shoe_right.jpg in the 2D Paint program.
- Select All the shoe_right.jpg background layer, and copy it as a new layer above background
in rend_right.tif image.
- Activate the Mask for the shoe_right.jpg layer, and set this new mask to full transparency (or
fill it with a black color),
so you won't see anything of shoe_rigth.jpg layer.
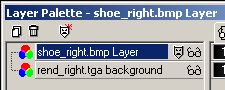
Paint Shop Pro Layers configuration.
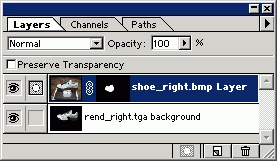
PhotoShop Layers Configuration.
Notice that the second icon in the layer
indicates that the layer mask is being edited.
- Activate the option to paint the current layer's Mask and start painting over the shoe...
If everything is ok, you should start seeing the real shoe material over the rendered image.
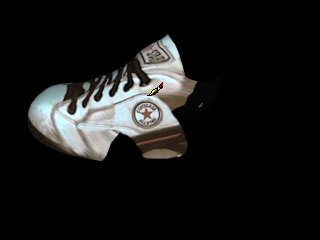
Painting the layer's mask.
- Paint all the zones where you think that the shoe_right.jpg layer looks better than the
rendered image. If you like, you can use any other 2D Painting tools to fix your image in
order to get a better result.
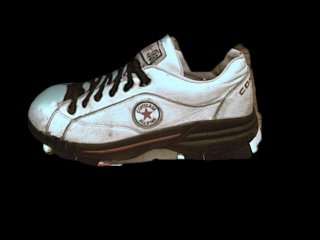
Final painted mask.
- When ready, remove the background layer and copy the Mask channel of the shoe_right.jpg layer
to the Alpha Channel. Then, delete the Mask without applying it to the layer (the full
shoe_right.jpg image should show up).
The RGB Channel.
The Alpha Channel.
- Save this image as rend_right.tif.
- Select the Shoe and open the PowerStamper Panel.
- Set rend_right.tif as the stamping image, make sure that camera_right is the current
viewport and click the Stamp button!
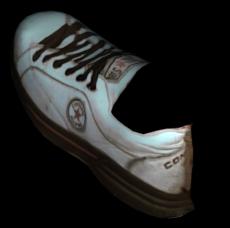
Painted Top and Right side of the shoe.
Using the same procedure as described above, paint the remaining zones of the shoe.
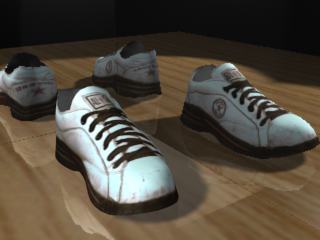
Finished shoe.

Finished shoe map.